Full notes
Full EXA: The Infinite Instrument update
Read the full published notes in a cleaner layout. The original post stays linked below.
What changed
- UI and audio
- Events
- Balance
- Gameplay
- Performance
- Fixes
The new “sequencer” interface is finally here! Sequencers can control the playback of loops, sections, and even other sequencers – allowing you to build up complex, full-length musical tracks within VR. The sequencer interface is more compact and powerful than the section interface, including the ability to start/stop a loop multiple times in the same row, to randomly select loops for playback, to configure sequencer playback to loop within a range of beats, and to immediately jump to new playhead positions. Also, EXA has added support for MixCast mixed reality display. This feature is available to users of MixCast Studio. MixCast has a variety of features that makes it easy to use mixed reality, including a three-click setup for static camera position, a background-replacement capability that does not require a green screen, and the ability for your mixed-reality self to become illuminated by the glow of EXA’s ringers. This release also includes a new laser-pointer “linking” tool (currently used by the sequencers), tool bits that shrink into “precision mode” when near a menu interface, a reusable keyboard interface, upgraded post-processing camera effects, EXA Remix improvements, and a variety of minor bug fixes. Thank you to the EXA community for the feedback and ideas! Please watch/share the new update video below, and read through this page to learn more.
DEV UPDATE VIDEO
https://www.youtube.com/watch?v=IP02VfFA3iA (Link)
SHARE EXA
Twitter: Release Announcement
Reddit: Release Announcement
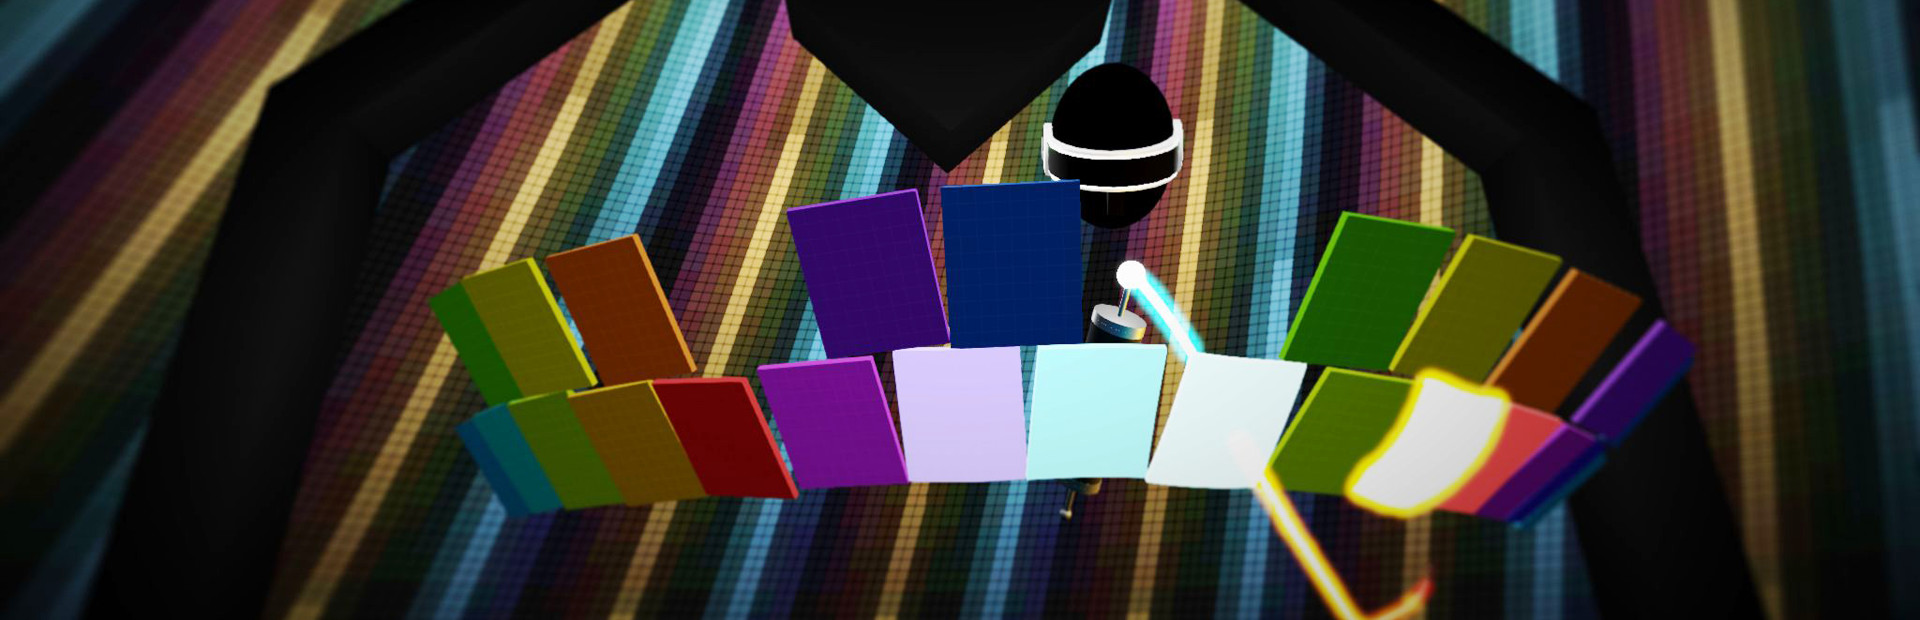
SEQUENCERS
The new sequencer interface allows you to plan and execute multiple start/stop events for the loops, sections, and other sequencers in your layout. The interface provides yellow “range bars”, which you can drag left/right to set the sequencer’s looping area. It also provides a while “playhead bar”, which you can drag left/right during playback to jump to different playhead positions. Strike the green ringer to the left of the sequencer to play and stop the sequencer playback.
You can link each sequencer row to one or more loops, sections, or other sequencers. Select the row’s blue “link” button to engage the link-creation mode. This attaches a blue “laser pointer” tool to your handle, which you can use to select/deselect items. When you point at a selectable item, it displays a blue border (or red, if it is already selected). Squeeze the controller’s trigger to select the item (or deselect, if it is already selected). Once selected, a curved line will appear, connecting the item to the “link” button.
When a sequencer row has multiple links, the row will randomly select one of those links for each new “start” event during playback. This is very useful for creating generative or randomly-combining music. As a simple example, you could link several “drum fill” loops to a single row, getting a new drum fill each time a “start” event fires. A more complex usage would be to record several bass, guitar, and piano parts, and link them to three sequencer rows to continually pick a new random combination of these parts.
A sequencer row needs start and stop events, which are paired together as a “span”. To add a new span, hover your cursor over an empty area in the row, and when a gray span appears, squeeze the controller’s trigger. Spans within the same row cannot overlap each other.
You can move a row’s spans by grabbing the start/stop events, or by grabbing the span that connects those events. You can grab these items with the grab tool or, recommended, by using the controller’s grip-to-grab interaction. Once grabbed, drag the item left/right to move it to a new position. Dragging the start/stop events changes the span’s duration, while dragging the span itself moves the span while maintaining its duration.
To delete a span from a sequencer row, grab it and drag it several centimeters in front of (or behind) the sequencer interface. Once the span turns dark gray, release the grab to complete the process.
There is no way to manually add sequencer rows. The sequencer automatically ensures that there is at least one empty row available. Adding an event or link to the last empty row (for example) causes a new row to be created. Additionally, a sequencer will never have fewer than three rows, even if they are all empty.
Each sequencer row has hidden “edit” buttons that you can reveal using the toggle button the arrow icon on it. To reorder the rows, grab/drag the buttons with the up/down icon. To name a row, select the button with the “A” icon, and enter text using the keyboard interface that appears. To delete (or reset) a row, select the red “X” button.
After selecting a sequencer, you can use the “Sequencers” menu that appears to disable editing, lock the range bars, export the sequencer’s audio, clone the sequencer, delete it, etc.
During playback, a sequencer’s links flash momentarily whenever their associated item is affected. A “start” event causes a green-tinted flash, while a “stop” event causes a red-tinted one. These flashes help to visualize the connections and cause-and-effect that occurs during sequencer playback.
Sequencers can be linked to other sequencers. Creating a hierarchy of sequencers is a very powerful way to build and control the layout’s loops and sections. Note that it is possible, but not recommended, to create circular-references between sequencers.
MIXCAST MIXED REALITY
You can now create mixed-reality views of EXA using MixCast. Currently, this is only supported for Vive – support for Oculus should come after the next MixCast release.
To start using MixCast mixed reality, click the gray MixCast icon that appears at the bottom left corner of the desktop monitor display. This icon is only present when you have MixCast Studio installed, and have a camera selected (anything but “None”) in MixCast Studio.
To toggle the MixCast icon visibility, use the “Ctrl+Shift+L” keyboard shortcut. To toggle the MixCast mixed reality mode, either click the icon or use the “Ctrl+M” keyboard shortcut.
Recommended MixCast lighting settings: “Take Lighting” at 1.0, “Base Amount” at 0.04, and “Light Power” at 5.0. These settings make your camera image darkened to match the low-lighting appearance of EXA environment, and allow the virtual lights from EXA’s ringers to clearly illuminate your camera image.
Recommended MixCast composition settings
use “Buffered” mode and select a delay time that keeps the virtual controller positions anchored closely to the controllers in the camera image. (For reference, the Logitech C922 camera that I use looks good with ~200ms delay time.)
Important
when recording or streaming mixed-reality video, configure OBS (or similar video-capture tool) to use the same delay time for audio. (For OBS, the setting is called “Advanced > Audio > Global Audio Sync Offset (milliseconds)”).
EXA REMIX
The Unity package for EXA Remix is now included when you download the full EXA app. The file is located in your EXA installation directory, named “ExaRemix-v1.3.1.unityPackage”.
Added a “color exponent” setting to the ringer material. This can be useful for achieving a better ringer glow colors if your app does not use HDR rendering.
Added component that locks the CursorTails and Motions objects to the world identity (regardless of their parent hierarchy transforms). This ensures that everything aligns properly, even when moving the parent transforms.
Improved performance while loading a layout by spreading the process out across several frames.
Fixed issues with the positions of the avatars when operating at non-original scales.
Fixed issues with the positions of the ringers when loading a layout and non-original scales.
Fixed issue causing errors when no camera is available in the scene.
OTHER
Tools now transition to a smaller “precision” size as they get closer to a menu panel. This makes it easier to see the menu items while interacting with them. Some tools have unique “precision” modes beyond just getting smaller: the mute tool becomes more transparent, the bow tool gets thinner, etc.
The keyboard interface is now reusable (for use with various menu interfaces) and displays a text field at top of the keys. Rather than anchoring the keyboard to the menu interface (like the “Save Layout” menu did), the new approach is for the keyboard to appear near to the keyboard-toggling button, with a gray link between the keyboard and the menu. You can grab/move the keyboard independently from the menu to place it in a more comfortable position for typing.
All virtual cameras in EXA (used for VR headset display, desktop monitor display, mixed reality, photo tool, etc.) now use Unity’s new post-processing effects stack. This upgrades the display to use Unity’s most recent visual features and encourages visual consistency across all of EXA’s various virtual cameras.
FIXES
Fixed issue that occurs when multiple Soundfonts share the same relative path and filename. All duplicates (after the first found instance) are ignored, and an in-app notification is displayed. To resolve this, change the folder or file name of the conflicting Soundfont.
Fixed issue that occurs when a Soundfont file references an internal instrument (by name) that is not present within the file.
Fixed issues related to the number and priority of “audio players” getting out of sync between EXA’s Unity side and its native audio side. If necessary, the native audio side can now immediately reclaim “audio players” that are in an “ending“ or “very low volume” state.
Fixed startup errors when SteamVR provides a null instance (which can occur due to various internal SteamVR hardware/setup failures).
Fixed issue where sustained notes (i.e. created with the “bow” or “prox” tools) within a recorded loop, in certain hard-to-reproduce scenarios, would never stop playing.
Source
Changelog.gg summarizes and formats this update. How we read updates.