
Full notes
Full The Tale of Relm update
Read the full published notes in a cleaner layout. The original post stays linked below.
What changed
- Balance
- Gameplay
The Tale of Relm changes
Boss Guide
Be aware that there are always multiple ways to win these fights, but this guide focuses on strategies that rely mostly on basic abilities, ensuring that anyone can follow along regardless of their build or optional skills.
Boss: WolfBull
Location: Prison Tower Floor 1
HP: 4875
Shields: 3
Weakness: Sword, Ice
Commands: Fireball, Double Attack, Strike All, Abide
EXP: 356
Gold: 500
Possible drops: Mana Orange (M), Healing Berries (M)
Set Up: The WolfBull uses Fireball so equip Copper Axe, Copper Sword, Copper Helm and Copper Shield (both Adol and Red Eyes) but keep Armor on Metal for this fight (the Copper ones’ are vulnerable to Fire)
Strategy:
Recommended: at least level 9 for Adol and Red Eyes.
First turn use Ice with Adol and boost attack with Red Eyes to immediately break him (He will however have 2 attacks between Adol and Red Eyes).
While he is broken, boost with Adol and use “Amputation” for a lot of damage and guard with Red Eyes (maybe even twice) to get a lot of boost points.
So every turn you can Boost and attack with Red Eyes, immediately breaking him while guarding with Adol to get Boost points for giving him damage when broken. Of course heal with items when needed. Keep in mind whenever you guard you can see where your character will come in the order. Guarding is an important basic ability as it always does 3 things: higher defense, faster turn and more Boost Points.
Boss: Captain
Location: Coburg
HP: 5750
Shields: 3
Weakness: Axe, Fire
Commands: Strike All, Abide, Fire Strike, Amputation
EXP: 380
Gold: 500
Possible drops: Mana Orange (M), Healing Berries (M)
Set Up: You could leave the Copper Armor out again for the Fire Strike, For the rest, everything Copper is strongest at this point. Remember that you don’t need a save spot in Town, you can save your game everywhere there.
Strategy:
Recommended: at least level 10 for Adol and Red Eyes.
This isn’t a particularly tough fight. Start by taking out the two small enemies first while keeping your HP around 1000 using Healing Berries. Once those two are gone, it becomes easy to break the boss consistently. Just use Fire Strike with Red Eyes and Axe Attack or Amputation with Adol.
You’ll get four turns between his attacks (two rounds). This means you can use Fire Strike twice and Amputation once to break him, and have Adol Guard once so he can unleash a big attack when the boss is broken.
Boss: Two Headed Snake
Location: Lava Cave
HP: 9300
Shields: 5
Weakness: Axe, Fire, Wind
Commands: Triple Attack, Fireball, Amputation, Abide, Heal, Poison
EXP: 970
Gold: 960
Possible drops: Mana Orange (M), Healing Berries (M)
Set Up: You could leave the Copper Armor off again for the Fire Ball, but leave it on for Melina since she has Fire protection. You can choose which skills to learn for Melina, but I recommend having Heal (it can be boosted to be stronger than Healing Berries). Critical or Weakness Boosters can also be useful, or you can save points to get Heavy Wind later.
Strategy:
Recommended: at least level 12 for Adol and Red Eyes, Melina will start at 12.
The key is still to break the enemy quickly. It now has 5 shields, but you also have Melina in the party. To break it, Red Eyes can use Fire Strike, Adol can use Attack or Amputation, and Melina can use Wind. By using Guard or Weakness Booster (if you have it) on Adol, it should again be possible to break the Snake every turn.
Use Rest with Red Eyes and Heal with Melina to keep HP high. The combination of Abide with Triple Attack can be devastating.
Always check the turn order to decide how to break it. If you don’t need extra attacks from Adol, then use Amputation for a guaranteed hit and save your boost points for when the enemy is broken. Keep in mind that although its weakness is Wind, a boosted Speed Spear will deal more damage when it’s broken. Melina can also cure poison.
Boss: Spider Queen
Location: Spiders Lair
HP: 10500
Shields: 5
Weakness: Sword, Ice, Wind
Commands: Haste, Delay Strike, Claw Blitz, Dark Blast, Increaser Growl
EXP: 1030
Gold: 1050
Possible drops: Mana Orange (M), Healing Berries (M), Onion of Life(M)
Recommended: at least level 15 for Adol, Red Eyes and Melina.
This isn’t really a difficult fight. You can use the Red Eyes guarding strategy again to get more sword attacks in. Always prioritize breaking over healing if you know you can break the enemy that turn. Once it’s broken, boost and use Amputation with Adol for heavy damage. For Melina, use a boosted Speed Spear or boosted healing. Red Eyes should mainly guard to quickly set up another break.
The toughest combination the Spider Queen can use is Increaser Growl together with Dark Blast, since Dark Blast hits all three party members instead of just one. Also Haste as well as Delay Strike can make it more difficult to get enough turns to break. Just chip away at its HP while keeping your health stable. You only need to bring it down to about 40% HP to trigger an event that will finish the fight.
Boss: Norok
Location: Oasis
HP: 11000
Shields: 5
Weakness: Sword, Ice, Wind
Commands: Strike All, Cross Strike, Wildfire, Shield, Abide
EXP: 1450
Gold: 1050
Possible drops: Healing Berries (M), Onion of Life(M)
Recommended: at least level 16 for Adol, Edge and Melina.
Take out the two Assassins first - they are the biggest threat early in the fight. Fire and Wind attacks will work. Once they’re down, the battle becomes much more manageable as long as you keep your HP up with Rest, Heal, or Healing Berries.
Then concentrate on Norok. His Wildfire is strong (he’s strong in Magic Attack), but the combination of Abide with Cross Strike or Strike All hits hardest.
He’s weak to Sword, so you should be able to break him quickly each time — just don’t attack with Edge while he’s broken. Use Edge to build job points.
Boss: Dark Elf Assassin
Location: Lurinn’s Castle
HP: 35725
Shields: 6
Weakness: Sword, Lightning, Fire
Commands: Strike All, Incite, Abide, Yatagarasu, Take Aim
EXP: 2499
Gold: 1432
Possible drops: Mana Orange (M), Healing Berries (M)
Recommended: at least level 18 for Edge and Jozef.
Change Brass Shield and Brass Armor because of the Lightning weakness. It looks like an impossible fight and Jozef is way too weak, so don’t really bother with him. If the boss doesn’t kill him in the first round, just try to break one or both Assassins with Arrow Rain. With Edge, just survive, so prioritize keeping his health really high with Rest.
On the 3rd turn you will regain full health and receive extra Attack Power and Haste. On the 4th turn you will regain full health again and get extra Attack Power plus a special attack that should give you the upper hand. After that, every strike will do massive damage, so it shouldn’t take long.
Boss: Ghalworm
Location: Town of Lurinn on Fire
HP: 14125
Shields: 6
Weakness: Sword, Ice, Staff
Commands: Strike All, Last Stand, Charge, Stout Wall, Claw Blitz
EXP: 1558
Gold: 1360
Possible drops: Healing Berries Bunch
Recommended: Level 18 for Edge, Celes and Mathilda.
For equipment, keep in mind that this enemy uses Spear, Axe, and Sword elemental attacks. You can’t really change equipment for Mathilda and Celes, and that’s fine — just make sure to protect Edge from breaking.
This is a very different battle than before, now that the two magicians are in the party. Mathilda can focus on healing everyone when the enemy is broken. It should be easy to break him, as all three characters can land multiple hits (Sword and Staff attacks).
The Ghalworm is strong against Fire, but not when it is broken. So if you chose to learn Fire Burst, it becomes the strongest magical attack during the break, since it hits twice.
Boss: Phoenix
Location: Pond of Fairies
HP: 13950
Shields: 6
Weakness: Sword, Light, Lightning
Commands: Fireball, Lightning Bolt, Icewind, Trade Tempest, Luminescence, Heal
EXP: 1977
Gold: 1760
Possible drops: Healing Berries Bunch, Herbs of Waking
Recommended: Level 19 for Edge, Celes and Mathilda.
This is probably the easiest fight so far. The Phoenix doesn’t really try to beat you, and none of its attacks are really that strong. It can be broken very quickly, and once it is, just use a big boosted magic attack with Celes while Mathilda handles healing and Edge focuses on guarding. Break it again as soon as possible and repeat the process.
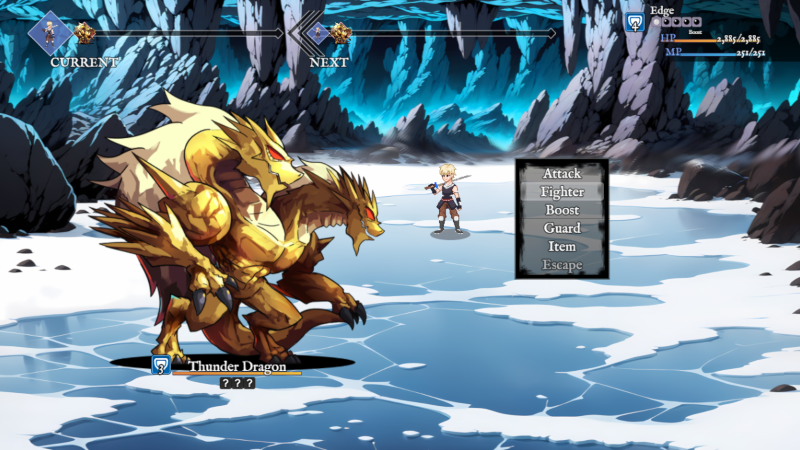
Boss: Thunder Dragon
Location: The Ice Cave of Orbonne
HP: 7777
Shields: 3
Weakness: Sword, Ice
Commands: Lightning Blast, Stout Wall, Poison, Force Strike, Holy Light, Dual Attack
EXP: 2000
Gold: 2160
Possible drops: Healing Berries Bunch, Onion of Life (L)
Recommended: level 22 for Edge.
You’re fighting this battle alone while your friends wait, so make sure you’re not using any equipment that makes you weak to Lightning or Light. If you’ve learned Force Strike by now, you can deal heavy damage. (If not you will have to use Strike All) Use Rest whenever your health gets low, (If you don’t have Rest use Healing Berries) and otherwise just keep using Force Strike. When the enemy is broken, use a boosted Force Strike to end the fight as quickly as possible.
Boss: General Andon
Location: Lurinn’s Castle
HP: 26600
Shields: 6
Weakness: Sword, Light, Staff, Fire
Commands: Thunderbird, Consume HP, Extra Turn, Strike All, Double Attack, Blind
EXP: 2800
Gold: 2560
Possible drops: Healing Berries Bunch, Bottle of Sleep, Onion of Life (L)
Protect yourself against Lightning!
This fight is made up of three battles.
1st Battle Edge starts alone against a Manipulation Ferral, two Assassins, and a Soulless Deer. Fortunately, you’re solo for only one round, so focus on staying alive and use Strike All to begin breaking the shields on three of the four enemies. On the second round, Mathilda joins and can handle healing while Edge slowly takes them down. Watch out for the Soulless Deer - its Light attack can deal heavy damage if you’re weak to it. Still, don’t change gear for Light resistance, your main priorities are resisting Lightning and Sword damage.
2nd Battle Celes joins the party. You now face two Soulless Assassins, one Assassin, and a Rat Plague. Defeat three of them quickly, but leave one alive for the moment. With only one enemy remaining, focus on healing the whole team so you enter the final battle with full HP.
3rd Battle Now you face General Andon along with two Assassins. All three have very strong Lightning attacks, and General Andon has extremely high Magic Attack, which is especially dangerous for Edge. His Extra Turn is a nuisance - made worse if the two Assassins are still alive - so eliminate them quickly (Fire Burst helps!).
Once only General Andon remains, the fight becomes more manageable. With his Extra Turn, he may sometimes take up to five turns in a row, so try to prevent that by breaking him just beforehand. Since he’s weak to Staff and Sword, all three characters can land multiple hits. When he’s broken, boosted Fire Burst and Force Strike are most effective, while Mathilda should primarily focus on healing.
Source
Changelog.gg summarizes and formats this update. How we read updates.